


Ice dams cause significant property damage through roof leaks, structural stress on gutters, water intrusion, and deterioration of roofing materials. Most ice dam problems are preventable through proper attic management, adequate insulation, balanced ventilation, and proactive maintenance. This guide explains ice dam formation mechanisms, evidence-based prevention strategies, safe removal methods, and protective roofing materials.
What Are Ice Dams?
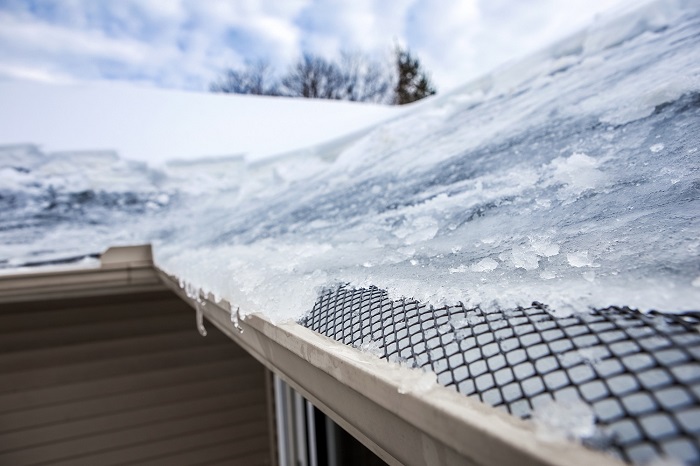
An ice dam is an ice ridge that forms at the roof edge when melting snow refreezes at the eaves. Snow melts on the warmer upper roof sections, flows downward as water, then refreezes when it reaches the colder roof overhang. This ice accumulation creates a barrier that prevents proper drainage, forcing subsequent meltwater to pool behind the dam and seep beneath shingles into the building envelope.
Unchecked ice dams compromise roof decking through prolonged moisture exposure, overload and detach gutters due to ice weight, and cause interior damage including ceiling stains, wall discoloration, paint failure, mold growth, and saturated insulation that loses thermal performance.
Warning Signs Include
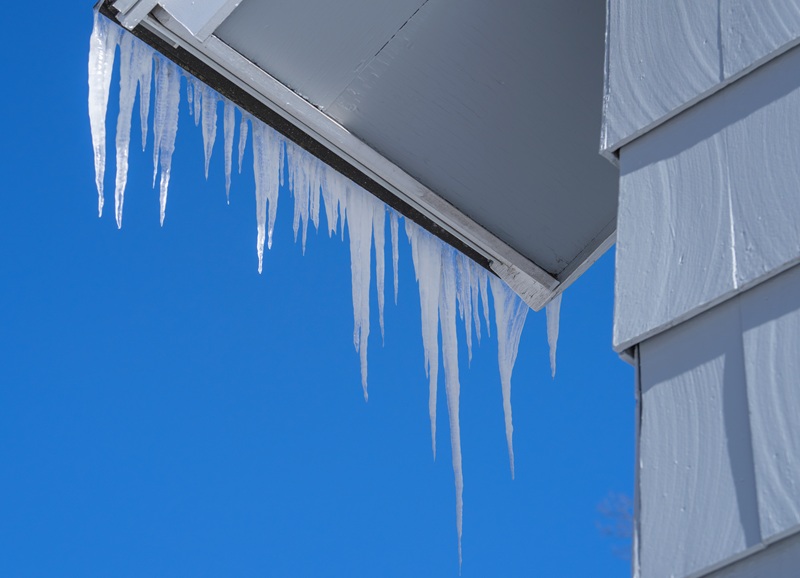
- Icicle formation along roof edges, particularly large or numerous icicles
- Water stains or discoloration on interior ceilings and exterior walls below the roofline
- Wet, compressed, or frost-covered attic insulation near eaves
- Ice accumulation persisting at roof edges during sunny conditions when upper roof sections are clear
What Causes Ice Dams?
Ice dams result from differential roof temperatures created by heat escaping from conditioned living spaces into the attic. This heat transfer raises the roof deck temperature above freezing, melting the snowpack’s underside. Meltwater flows down the roof slope until reaching the eaves, which remain at or below freezing because they extend beyond the heated building envelope. The water refreezes upon contact with the cold surface, gradually building an ice ridge.
Inadequate attic insulation allows excessive heat transfer from living spaces to the roof deck. Air leakage through gaps around recessed lights, attic hatches, plumbing penetrations, duct chases, and chimney surrounds bypasses insulation entirely, delivering warm air directly to the attic space. Poor ventilation traps this warm air and moisture in the attic, further raising roof deck temperatures. Together, these deficiencies create the thermal conditions necessary for ice dam formation.
Weather patterns significantly influence ice dam development. Heavy snowfall of four inches or more provides insulation that traps heat against the roof surface, accelerating melting. Temperature fluctuations with daytime highs above 32°F and nighttime lows below 32°F create ideal melt-freeze cycles. Sunny days following snowfall enhance melting on south-facing roof sections even when air temperatures remain below freezing. Prolonged cold periods after snow events allow ice dams to grow larger and more destructive as repeated freeze-thaw cycles add layers of ice.
How to Prevent Ice Dams on Your Roof
Effective ice dam prevention addresses the root thermal problem rather than treating symptoms. The most reliable approach combines three interconnected strategies: comprehensive air sealing, adequate insulation, and balanced attic ventilation.
Air Sealing
Air leakage represents the primary pathway for heat loss into attics. Warm air rises through any available opening, creating convective loops that dramatically increase heat transfer beyond what conduction through insulation alone would produce. Identifying and sealing these gaps is the critical first step in ice dam prevention.
Priority air sealing locations include recessed light fixtures (replace with IC-rated airtight models or seal with airtight covers), attic access hatches and pull-down stairs (install weatherstripping and insulated covers), plumbing stack penetrations, electrical wire penetrations, duct chases between floors, chimney surrounds (use high-temperature caulk or sheet metal), and wall top plates where interior walls meet the attic floor. Use expanding foam for large gaps, caulk for small cracks, and rigid blocking with sealant for major penetrations.
Insulation
The U.S. Department of Energy recommends R-49 to R-60 insulation in attics for cold and very cold climates (climate zones 5-8), which includes most regions experiencing ice dams. This typically requires 16-20 inches of fiberglass batt insulation or 13-17 inches of blown cellulose or fiberglass.
Ensure insulation extends fully to the eaves without blocking soffit vents. Install baffles (also called rafter vents or ventilation chutes) between rafters at the eaves to maintain an airflow channel from soffit vents to the attic space. Never compress insulation, as this reduces its R-value. Pay special attention to areas above exterior walls, cantilevered floors, and other irregular joist spaces where insulation is frequently missing or inadequate.
Ventilation
Balanced attic ventilation removes heat and moisture that penetrate even well-sealed, well-insulated attics. The International Residential Code requires a minimum of 1 square foot of net free ventilation area for every 150 square feet of attic floor space, or 1:300 if using balanced intake and exhaust with a vapor retarder.
Effective ventilation requires both intake vents at the soffits and exhaust vents at or near the ridge. This configuration creates natural convection as chilly air enters at the eaves, warms slightly as it moves across the attic floor, and exits through ridge vents or other high exhaust points. Common exhaust options include continuous ridge vents (most effective), roof-mounted turbines, static roof vents, or gable vents. Soffit vents should provide intake along the entire eave length.
Avoid mixing ventilation types that compete or short-circuit airflow. For example, powered attic ventilators often draw air from ridge vents rather than soffit vents, negating the intended ventilation pattern. Similarly, combining ridge vents with gable vents can create short-circuit paths that leave portions of the attic unventilated.
Additional Prevention Measures
Beyond the core thermal management strategies, several supplementary practices reduce ice dam risk. After major snowfall (typically 6+ inches), use a roof rake from ground level to remove snow from the lower 3-4 feet of roof starting at the eaves. This eliminates the snow that would otherwise melt and contribute to ice dam formation. Roof rakes with telescoping handles allow safe removal without ladder use or roof access.
Maintain gutters and downspouts free of leaves, twigs, and debris before winter begins. Clogged gutters trap water and ice, exacerbating ice dam problems and adding weight that can detach gutters from fascia boards. Schedule cleaning in late fall after leaves have dropped.
Conduct seasonal roof inspections in spring and fall to identify and repair loose or damaged shingles, compromised flashing around chimneys and vents, and blocked or damaged ventilation components. Address these issues promptly to maintain roof integrity and ventilation performance.
Self-regulating heat cables installed along roof edges and through gutters and downspouts provide supplementary protection in persistent trouble areas. These cables automatically adjust their heat output based on temperature and moisture conditions. However, heat cables address symptoms rather than causes and should supplement—not replace—proper insulation and ventilation. Install cables in a zigzag pattern along the eave edge and straight down through gutters and downspouts to create drainage pathways.
When replacing a roof, install ice and water shield (also called ice and water barrier or leak barrier) along eaves, in valleys, around chimneys and skylights, and other vulnerable areas. Building codes in many cold-climate regions require ice and water shield extending from the eave edge up the roof to a point at least 24 inches inside the exterior wall line of the home. This self-sealing membrane provides a waterproof layer that prevents water infiltration even when ice dams force water under shingles.
How to Get Rid of Ice Dams Safely
When ice dams form despite preventive measures, safe removal minimizes damage while avoiding personal injury and roof harm. Work exclusively from ground level whenever possible and never walk on snow-covered or ice-covered roofing.
Use a roof rake to remove snow from the lower roof section, eliminating the snow that feeds meltwater to the ice dam. Remove snow in the first 4-6 feet from the eave edge if accessible from the ground. This stops the melt-refreeze cycle by removing the source material.
For temporary drainage relief, create meltwater channels through existing ice dams using calcium chloride. Fill cloth tubes (old pantyhose, cut-up T-shirts, or purchased ice melt socks) with calcium chloride and position them perpendicular to the roof edge, crossing the ice dam. The calcium chloride melts through the ice over several hours, creating a channel for trapped water to drain. Never use rock salt (sodium chloride), as it corrodes metal roofing components, damages shingles, kills vegetation below the roofline, and is less effective at low temperatures. Protect landscaping with tarps and avoid letting melt run onto concrete surfaces or into contact with metal gutters and flashing.
Avoid chipping, hammering, or prying ice from roofs. These mechanical removal methods inevitably damage shingles, tear underlayment, dent metal components, and void manufacturer warranties. The immediate ice removal does not justify the roof damage and likely leak points created.
For large, persistent, or recurring ice dams, hire professional ice dam removal services that use low-pressure steam equipment. Steam removal melts ice without the thermal shock of hot water or the physical damage of mechanical methods. Professional services can safely access roofs, work from lifts or scaffolding, and remove ice without harming roofing materials.
After addressing immediate ice dam problems, schedule permanent solutions. Contract with insulation professionals to assess and upgrade attic insulation and air sealing. Consult with roofing contractors specialists to design and install proper ventilation systems. These investments prevent recurrence and protect long-term home integrity.
How GAF Roofing Products Help Reduce Ice Dam Risk
A complete roofing system integrates multiple components to manage winter conditions and minimize ice dam damage. While proper attic insulation and ventilation remain the primary prevention strategies, quality roofing materials provide critical backup protection.
Ice and water shield products like GAF StormGuard and WeatherWatch Ice & Water Leak Barrier create a waterproof membrane beneath shingles at vulnerable locations including eaves, valleys, roof-to-wall transitions, and around penetrations like chimneys and skylights. These self-adhering modified bitumen membranes bond directly to roof decking and seal around fastener penetrations. When ice dams force water under shingles, the ice and water shield prevents infiltration into the roof deck and building interior.
How Proper Installation Can Decrease the Chances of Ice Dams
Installation quality determines ice and water shield performance. The membrane must extend from the eave edge up the roof to at least 24 inches beyond the interior wall line—typically 3-6 feet up the roof depending on eave overhang depth. In severe ice dam regions, extending protection further up the roof (6-8 feet or more) provides additional security. Overlaps between membrane sheets must meet manufacturer specifications (typically 6 inches minimum) and all seams should be fully adhered.
Proper attic ventilation works with roofing materials to keep the roof deck temperature uniform and close to outdoor air temperature. Continuous soffit vents paired with ridge vents or other high exhaust points allow air circulation that removes heat accumulation. Ventilation baffles installed between rafters at the eaves maintain airflow channels from soffit to attic even when insulation fills joist bays.
Integrated flashing and drip edge components ensure proper water shedding at roof edges, valleys, and penetrations. Drip edge directs water away from fascia and into gutters. Step flashing at roof-to-wall intersections and counter-flashing around chimneys prevents water entry at these critical junctions.
Quality shingles designed for cold-climate performance, such as GAF Timberline HDZ shingles, incorporate features like advanced adhesive systems that maintain bond strength in temperature fluctuations and reinforced construction that resists damage from ice accumulation and freeze-thaw cycles.
Professional installation by certified contractors ensures all system components work together as designed. Certified installers understand proper ventilation design, correct ice and water shield application, appropriate fastener patterns and depths, and the integration of all roofing components. They can assess specific home configurations and recommend solutions for challenging details like dormers, valleys, skylights, and complex roof intersections where ice dams frequently form.
FAQs: How to Prevent and How to Get Rid of Ice Dams
Some of our most frequently asked questions regarding homeowners’ troubles with ice dams:
What is the best ice dam protection?
The most effective protection is preventing ice dams from forming in the first place through proper attic insulation and ventilation. Ensure your attic maintains temperatures close to outdoor temperatures by sealing air leaks, adding insulation (R-49 to R-60 in cold climates), and installing adequate roof ventilation. For existing roofs, heated cables along roof edges and gutters provide reliable prevention. Metal roofing or installing ice and water shield membrane under shingles during construction also offers strong protection.
What can I put in my gutters to prevent ice dams?
Heated gutter cables (heat tape) are the primary solution. These electric cables run through gutters and downspouts, creating water drainage channels. Install them in a zigzag pattern along roof edges and straight through gutters and downspouts. Avoid gutter guards in ice dam-prone areas—they can trap ice and worsen problems. Some homeowners use calcium chloride ice melt in pantyhose laid across ice dams, though this is more treatment than prevention.
What is the main cause of ice damming?
Heat escaping from your living space into the attic warms the roof, melting snow. This meltwater runs down to the colder roof eave where it refreezes, creating a dam. The dam blocks subsequent meltwater, which backs up under shingles and leaks inside. Poor attic insulation, inadequate ventilation, and air leaks from recessed lights, ductwork, or gaps around chimneys are the primary culprits.
Is it safe to put salt on the roof to melt ice?
Regular rock salt (sodium chloride) should never be used—it corrodes metal, damages shingles, kills vegetation, and harms concrete. Calcium chloride is safer for roofs and works at lower temperatures. Place it in fabric tubes (old pantyhose or mesh bags) laid perpendicular to the roof edge to melt channels through ice dams. Even calcium chloride can damage roofing materials with repeated use, so use sparingly and as a temporary measure only.
Do gutter heaters prevent ice dams?
Gutter heaters (heated cables) help manage ice dams but do not prevent them entirely. They create drainage pathways through ice, preventing water backup and interior damage. However, they address the symptom, not the cause. For complete prevention, combine heated cables with proper attic insulation and ventilation. Run heaters before and during storms rather than after ice forms. They are most effective as part of a comprehensive strategy, not as a standalone solution.
Contact DaBella for a Free Roof Replacement Quote
As a GAF Master Elite contractor, DaBella installs engineered roofing systems built to withstand harsh winter conditions and minimize ice dam risk. Our installations include premium Timberline HDZ architectural shingles, ice and water leak barriers at critical roof areas, and properly designed attic ventilation systems customized to your home’s specific requirements.
We will assess your current roof condition, identify vulnerabilities, and recommend solutions that align with your priorities and budget. Financing options available to qualified homeowners. Contact us today at 844-DaBella or request a consultation online to schedule your free roof inspection and protect your investment year-round.